 Learning Goal #8
3JS Interactive Environments
Students will be able to design an interactive game environment with controllable avatars and unique objects.
GETTING STARTED
Read More This lesson was designed to give you a few more tips about creating online game environments. You will learn how to create multiple objects with a single function, how to connect objects to form an avatar, and how to add textured images to 3D shapes. You will also learn how to animate and control your objects. Remember, this is a continuation of all the “How Do I” review tips from the last lesson and it is in your interest (as well as your team) to pay attention and listen for new tips that you might have missed along the way.
This lesson is broken into five parts with a simple challenge at the end of each part (just like the last lesson). As a class, we will discuss each part and each “How Do I” tip, but you and your team will be responsible for solving each challenge. If you complete a challenge, do not go onto the next tip. Instead, spend some time with your partner making sure that ALL OF YOU are comfortable with all the “How Do I” tips. Chances are, your team will benefit from your support. If you and your team are comfortable with all the “How Do I” tips, then it’s time to get up and assist another team until almost everyone in the room feels comfortable. Remember, this is about everyone getting comfortable and it’s not just about you. It’s about you, your team, and anyone else who needs your support. Do not SHOUT or TWIST your screen to show someone something you created or you will be asked to log off. Practice your moderated enthusiasm.
- Step 1: File Setup
Create a new document with Notepad++ called “shipsatthedock.html” and save it to your LG8_gamejs subfolder. - Step 2: Code Setup
Copy this source code into your “shipsatthedock.html” file, save it, and then set up your split screen.
Part 1: Working with Animations
Read More Copy/paste this True/False Animation Code Snippet between Lines 75-80.
Question 1: How Do I… Control Animations with True/False?
When you look at the code snippet, you should notice that the first line is a variable that says TRUE. When a variable is set to TRUE, that means it will happen on the screen without any control. It will do exactly what it was told to do. When a variable is set to FALSE, it will only happen if another event is created to control it (for example, the keydown event).
Question 2: How Do I… Manipulate Variable Functions?
As you’ve seen before, this is an animation function, but the word ANIMATE is just a variable that can be called anything else you decide to name it. If you set up multiple animations (like a separate function for the stars and a separate function for the boats), you would have to call them something different. For example, you might want to see a shooting star shaking in the background (like an asteroid slowly coming toward the water), but you might also want one of the boats to be moving with the wind. If you created a function for a shooting star, it might look like “function shootingStar()”.
Question 3: How Do I… Control Conditional Statements?
An IF statement, as we learned at the beginning of the semester, is conditional. It suggests that something else is about to happen, but only IF something else is done. In JavaScript, IF statements are sort of like functions inside of functions. Notice that this particular IF statement opens and closes with a mustache bracket, but it’s inside of the mustache brackets of a larger ANIMATE function.
Question 4: How Do I… Combine Rotations and Position Changes?
The line that begins with sailboat.rotation.y ends with a semicolon because that’s the end of a statement. But if you wanted the sailboat to rotate along multiple axis points in the wind, you could simply copy that single statement and paste it two more times below, just changing the axis lines and the speed. Always remember that if you’re going to copy/paste a line and change something, you need to check both sides of the statement. For example, if you copy/paste the IF rotation, but only change the Y on one side, the code will break.
Question 5: How Do I… Separate Rotations?
If you want to imagine that there are different IF functions that can each be set to true or false, then each IF statement should be copied and pasted below each closing mustache bracket. For example, you might want two separate wind variables (wind1 and wind2) to show what happens when the wind hits the boat from two different directions.
Question 6: How Do I… Change the Speed of an Object?
Speed is an easy thing to change, but it’s not always easy to identify what the numbers represent. In this code snippet, 0.08 represents the number of times the object will rotate around the Y axis per second. If you up the number to 0.58, you’ll already be increasing the speed quite a bit. There’s no need to use HUGE numbers like 156.75 because it doesn’t take much to increase speed. In fact, the bigger the number, the more likely your browser is to freeze up.
Practice Challenge
Find a way to make it so that the wind automatically pushes the sailboat backward or away from the camera (even if it moves really slowly).
When you and your team think you are finished, raise ALL of your hands to be checked. This can be either extremely difficult or easy, depending on the student(s). If you all get it and are approved by the teacher, then it’s your turn to become a teacher for someone else in the room. Do not go on to Part #2.
Part 2: Working with Key Controls
Read More Copy/paste this Keydown Function Code Snippet in the next section where it says “Add Your Keydown Function Snippet Below.”
WARMUP CHALLENGE:
You just added keyboard control to the code, which means that you should be able to move the ship forward, backward, left, and right. But nothing happens. If you can figure out why, then go ahead and fix it, then raise your hand.
Question 1: How Do I… Work with the Event Listener?
Right now, you’re trying to tell certain objects to move ONLY when certain “events” happen either on the keyboard or with the mouse. So in the code snippet you just used, you can see that the event is called KEYDOWN, but you can also use KEYUP, MOUSEDOWN, or even MOUSEUP as “events” for the document, but be careful not to mess around too much with the MOUSEDOWN or MOUSEUP events unless you think you’ve mastered the other two and have some extra time. MOUSEDOWN and MOUSEUP are a little more tricky and might require some Googling of THREE.JS. It takes quite a bit of practice, but learning how to control an object is a HUGE part of learning how to make an online video game with JavaScript.
Question 2: How Do I… Find All Those Keyboard Code Numbers?
Every key on your keyboard is represented by a number that your computer reads and understands. In order to get your computer browser to read a key that you push, you have to code that key into your script. More specifically, you need to code that key into an EventListener. To find those JavaScript Key Codes, just click here.
Question 3: How Do I… Decide Which Axis Lines to Move My Objects?
You should notice that there is no key that controls how the objects move along the Y axis. This is because the current environment has depth. Objects may move left or right and even forward or backward, but they would not logically move up or down unless the environment was made with two dimensions.
Question 4: How Do I… Control the Speed of a Keydown Function?
Keydown speeds are based on a certain number of pixels per push. For example, the sailboat is set to move at 40 pixels per push of a specific key. If you adjust the number higher or lower, then you are saying you want the object to move either slower or faster. You can also switch between + and – depending on which direction you want the object to move along a specific X, Y, or Z axis. Don’t forget that if you copy/paste a keycode line and want to change the axis, you need to change it on both sides of the equal sign.
Question 5: How Do I… Control the Animation?
Notice that the last IF statement (for the WIND animation variable) only requires you to say wind = !wind. This is because the exclamation point tells the browser to begin the wind animation if a certain key is pushed. If you create more animation variables, make sure you set them to FALSE before trying to get a key code to respond.
Question 6: How Do I… Control the Camera Marker?
Just above the EventListener, you should see a new variable (var) called a marker. Right now, the marker is set to equal a 3D Object, which means that it will respond to your 3D environment. But what’s more important is that the marker was added to the camera, so you can control how much of the environment your object sees. To do this, either replace all the “sailboat1” variables with “marker” in the keydown eventListener or just create separate keycodes for the marker itself.
Practice Challenge
Come up with a way to turn one of the stars into a SHOOTING STAR with just the push of a single key.
When you and your team think you are finished, raise ALL of your hands to be checked. This will be extremely difficult for most students in the room. If you both get it and are approved by the teacher, then it’s your turn to become a teacher for someone else in the room. This isn’t a time for bragging, but for making everyone else around us better. Do not go on to Part #3.
Part 3: Multiple Object Functions
Read More Go to your Code and press CTRL-A, then delete everything. Copy/paste this New Ships at the Dock Code into your document. Save and refresh. Next, find Line 39 and copy/paste the Multiple Object Functions Code Snippet. Save and refresh.
Question 1: How Do I… Control the Depth of X and Z?
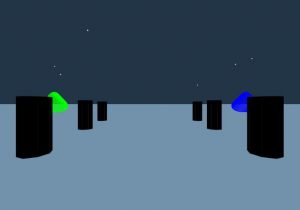
When you set up a function for objects, you can use any combination of X, Y, or Z, but in a 3D environment with depth, it’s better to place objects along the horizontal axis (x) and zoom access (z). If you try to place objects along the Y axis, you would actually be placing them off track. For example, if you placed one of the poles along the positive side of the Y axis, the pole might look like it’s floating above the water instead of being IN the water.
Question 2: How Do I… Set Up Fixed Points?
In the line that says pole.position.set, notice that the only axis that has value is the Y. This is because only the X and Z points will be controlled when the functions are created, so the Y becomes a fixed point. In other words, if you change the value of the Y, you are manipulating the placement of all the objects when they are created in the functions. For example, if you decrease the Y value from -75 to -175, you will be moving the poles down and it will look like the boat is floating above them, which doesn’t seem quite right.
Question 3: How Do I… Deal with Function Placement?
Once the function is closed with a mustache bracket, you can begin to make that function happen. In the example, each time you write makeDockAt, you are attempting to place a pole somewhere along the X and Z coordinate plane. In this case, it would seem a little odd if the poles were out of alignment, so they’ve been set up in a pattern going forward.
Question 4: How Do I… Manipulate the Marker?
Remember that the Marker Code Snippet is already in your code. If you want the freedom to move your boat around more of the environment, simply go to the Keydown Event Listener and change “sailboat1” to “marker” wherever you want more control.
Practice Challenge
Add four more poles behind the camera so that when the boat moves backwards, you see more of the dock.
When you and your team think you are finished, raise ALL of your hands to be checked. This will be extremely difficult for most students in the room. If you both get it and are approved by the teacher, then it’s your turn to become a teacher for someone else in the room. This isn’t a time for bragging, but for making everyone else around us better. Do not go on to Part #4.
Part 4: Avatar Connectors
Read More Copy/paste this Avatar Connectors Code Snippet in the next section where it says “Connect Another Object to the Sailboat.”
Question 1: How Do I… Know What the Avatar Actually Is?
You should notice immediately that nothing is actually called AVATAR in the code. But an avatar is just another word for an object or an icon that is controlled or designed by someone else. Anything can be an avatar if we choose to control it. In this example, sailboat1 is the avatar and we’re connecting another object (logs) to the sailboat.
Question 2: How Do I… Properly Place My Connected Objects?
You already know how to position objects along the various x, y, or z axis lines, but when you’re connecting one object to another, it’s important that other objects aren’t positioned in a way that they can’t be seen. In other words, when this demo is finished, the “logs” will actually look like logs below the sail, but if the logs variable isn’t positioned below the sail, the logs will seem out of place.
Question 3: How Do I… Simply Connect Objects to Each Other?
The last line of your snippet code should be pretty easy to understand now. If you want the second object to move WITH the first object, one has to be added to the other. In this case, the logs are being added to the sailboat1 and anytime the sailboat1 object moves, the logs object will go with it.
Question 4: How Do I… Complete the Avatar Position?
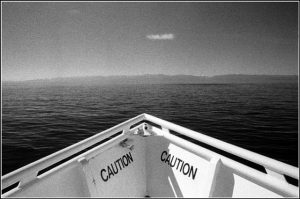
Don’t forget that your avatar doesn’t have to be smack dab in the middle of the screen. For example, you could POSITION the sailboat avatar to be slightly back behind the camera so that you only see the bow of the boat moving through the water like this. All it would take is to change the Z axis point until you find just the right value.
Practice Challenge
Go ahead and find a way to move the sailboat almost all the way behind the camera so that you are only looking at the front bow of the boat (kind of like a First Person Driver). To be successful, you might even want to manipulate the shapes and add some rotations. The picture above might also help to give some perspective.
When you and your team think you are finished, raise ALL of your hands to be checked. This will be extremely difficult for most students in the room. If you both get it and are approved by the teacher, then it’s your turn to become a teacher for someone else in the room. This isn’t a time for bragging, but for making everyone else around us better. Do not go on to Part #5.
Part 5: Texture Generators
Read More Copy/paste this Texture Generator Code Snippet just below Line 25 where it says “Add Your Texture Variables Below.”
Question 1: How Do I… Explain Texture for a 3D Design?
We spend a lot of time talking about 3D objects, but in reality, you’re still just looking at a 2D Screen. The way that 3D objects have depth on a 2D screen is by adding some kind of multi-colored Mesh or a textured Mesh. Texture is something that appears like it could be felt or touched (like fur, wood, hair, sugar, flour, etc).
Question 2: How Do I… Find Appropriate Textures for a 3D Design?
Now that you know what textures are, the purpose of this final TIP is to help you add image files to your 3D objects. Could you get away with using an image that isn’t a texture? Absolutely. But as you’ve seen before, that image would look pretty weird. If you were building your own environment, you could go search Google for a texture, but for this demo, go ahead and save these three images to your LG8_gamejs subfolder: sail – logs – metal.
Question 3: How Do I… Set Up Texture to a 3D Design?
Since the textures you just saved are sitting in the same place as your “shipsatthedock.html” file, the FILEPATH should be very easy to write into the part that says “FILEPATH or URL”. If you were just going to use textures online, then you’d copy and paste the URL instead. The FILEPATH is just a path to the image from the file you’re working on. In this case, if your images were saved to another subfolder in your VGD2 folder, your FILEPATH might look more like ../LG2_canvasjs/abstract.jpg or something like that. The “../” just means to go UP a folder.
Question 4: How Do I… Apply Texture to a 3D Design?
Even if you have three different variables called texture1, texture2, and texture3 with different images in each variable, the 3D objects have no idea that you want them to have a texture until you go into the MeshBasicMaterial and type in a command between the mustache brackets that says map:texture1 or map:texture2 or map:texture3. In this case, we’re going to add texture1 to sailboat1, texture2 to logs, and texture3 to pole. And that’s it. If you were going to use a different texture or even another variable, then you would just need to change or add the appropriate codes and FILEPATHS.
Practice Challenge
Go ahead and find three different textures and replace the ones that you were given.
When you and your team think you are finished, raise ALL of your hands to be checked. This will be easy for some students and more difficult for others. If you and your partner both get it and are approved by the teacher, then it’s your turn to become a teacher for someone else in the room. This isn’t a time for bragging, but for making everyone else around us better.