Topic #1 – A New Message from Hakon Wium Lie
 “HTML represents a document with a tree-like structure. Elements in HTML have children and parents. There are many reasons for having tree-structured documents. For style sheets, there is one excellent reason: inheritance. HTML elements inherit traits from their parents, just like children do. But instead of inheriting genes and money, HTML elements inherit stylistic properties.”
Hakon Wium Lie, Cascading Style Sheets: Designing for the Web
Open up a new document with Notepad++ and save it as “boxmodel.html” in your “pages” folder.
Topic #2 – The Document Object Model
 When you look at one of your HTML codes, what you should always see are a collection of elements (opening and closing tags). But those elements should not be randomly placed all over your code. In most cases, you create your section elements (header, article, footer, etc) and then place content-related elements (h1, p, span, etc) inside of those. All of this is done before you start styling with CSS.
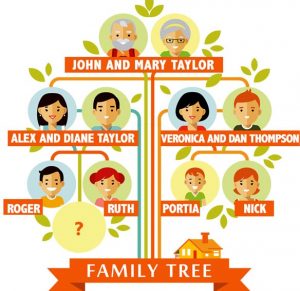
All of the elements on an HTML code can be written out like a family tree that explains what elements are inside other elements. Another way to look at this is that there are parent elements and there are child elements. If you try to imagine your own family tree with parents, grandparents, and great grandparents, this might make more sense. The Document Object Model (DOM) is a way of describing HTML like a tree of objects.
Topic #3 – The Box Model
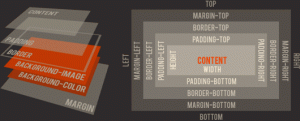
You may not always see it, but when you open up an HTML page with a browser, all of those elements from the Document Object Model are surrounded by boxes. The paragraph element. The h1 element. The footer element. Every single element is surrounded by a box. And for this reason, web designers often refer to something called The Box Model. The Box Model means that there is a box, whether you see it or not, around every single HTML element. When you style that element with CSS, you can make that box look unique. Click on the link in this paragraph to learn a little more about The Box Model and even experiment with how it works.
Topic #4 – Width, Height, & Background
 If every element is basically just a box, then without style, that box will only be as big as the content inside. For example, if you create a paragraph element (p), but do not style it, that element will only be as big as the text you write in between the opening and closing tags.
In your stylesheet, the width and height declarations help to give your elements a specific dimension. When possible, your width should be written as percentages rather than pixels. If you set the width to pixels, your elements may run out of space on a screen with less resolution. However, height should always be written with pixels or em because the mouse is naturally designed to scroll up and down whenever space runs out.
So much time in this class has been devoted to adding backgrounds, but it’s important to understand that an element with no background will inherit (or follow) the background of the parent element. For example, if you create a DIV element inside of your BODY element, but you don’t give your DIV a background (color, image, gradient, etc), then your DIV element will simply take on the background of your BODY element.
Topic #5 – Padding, Borders, & Margins
 As you saw in the Topic 4 demo, an element can contain padding, borders, and margins. But these can be confusing. Try to remember that padding controls how much space is around the content inside of your element. Borders control the edges of your element. And margins control how much space is used around the outside of your element. Let’s try it again.
Topic #6 – Overflow & Hidden Elements
You have probably seen a lot of websites that have scrollbars going left to right (horizontal) and some with scrollbars going up and down (vertical). The reason this happens is because the designer of that website wanted an element to fit an exact amount of space even though the content inside that element was going to take up more room. In CSS, there is an overflow property that allows us to control whether someone can see part or all of our content. Click on the link in this paragraph to learn a little more about the Overflow Property and even experiment with how it works.
But what if you just want to make an entire element invisible? Here is the visibility property.
Topic #7 – The Box Shadow
After learning about the text-shadow property, many of you applied it very well to some of your demos. Well guess what? You can also apply shadows to boxes. Imagine that. If every element is just a box, then every single element could have its own shadow. That might be a little much, but feel free to experiment with the box-shadow property before we get into our design for the day.
 All of the elements on a web page can be broken down into something that looks a lot like a family tree with parents and children. For example, a paragraph (p) element might be inside of a DIV element, so the P element would be a child of the DIV element and the DIV element would be a parent of the P element. This process of looking at the family tree of all your elements is known as the Document Object Model.
 “HTML represents a document with a tree-like structure. Elements in HTML have children and parents. There are many reasons for having tree-structured documents. For style sheets, there is one excellent reason: inheritance. HTML elements inherit traits from their parents, just like children do. But instead of inheriting genes and money, HTML elements inherit stylistic properties.”
 When you look at one of your HTML codes, what you should always see are a collection of elements (opening and closing tags). But those elements should not be randomly placed all over your code. In most cases, you create your section elements (header, article, footer, etc) and then place content-related elements (h1, p, span, etc) inside of those. All of this is done before you start styling with CSS.
 If every element is basically just a box, then without style, that box will only be as big as the content inside. For example, if you create a paragraph element (p), but do not style it, that element will only be as big as the text you write in between the opening and closing tags.
 As you saw in the Topic 4 demo, an element can contain padding, borders, and margins. But these can be confusing. Try to remember that padding controls how much space is around the content inside of your element. Borders control the edges of your element. And margins control how much space is used around the outside of your element. Let’s