Learning Goal #5
Students will be able to construct complex web pages and understand the purpose of every HTML element, attribute, and value that was written into their code.
PART 1: Deadlines
Read More
Below are your deadlines for Learning Goal #5: Mastering the Foundations of HTML. If you complete approximately 1.5 lessons per week, you should be able to keep up with the deadlines.
- January 11, 2019:
Getting Started – Lesson 5.0 - February 1, 2019:
5 Lessons Complete (5.1 through 5.5) - February 4, 2019:
Quarter Quiz #1 (Questions from 5.1 through 5.5 Only) - March 1, 2019:
6 Lessons Complete (5.6 through 5.11) - March 4, 2019:
Quarter Quiz #2 (Questions from 5.1 through 5.11) - March 4 to March 13, 2019:
Learning Goal Project (Grading on March 13)
REMINDER: In order to earn an A for each lesson, you need to complete each assignment within the lessons. At the end of each lesson, you will take a short quiz on eCampus and confirm that you have done all the assignments. If you only do some of the assignments, you can still do okay, but it is in your best interest to complete them all. Your grade depends on how much you get done within the time you are given.
PART 2: Overview
Read More
Building a table with HTML is a lot like building a chart of information with boxes known as cells, rows, and columns. For example, this is a box with 40 cells, 10 rows, and 4 columns. A long time ago, web designers built their entire web pages using the table tag as a way to separate content into smaller areas, but it never really looked good. Over time, it became clear that tables were great for SOME content, but not ALL content. Lists, on the other hand, have always been important for web designers because they help to organize and gather information. This lesson will prepare you to build tables and write lists with HTML.
Below are some helpful tips and resources that you can use during and after this lesson is over.
Important Points to Remember
- When we talk about “tables” on a website, we’re talking about a collection of rows and columns, much like the little cell blocks you see in Microsoft Excel. Here’s an example of what a table might look like on a website.
- To add a table of data on your website, you use the table tag, but there won’t be a table without columns (td tag) and rows (tr tag).
- Like almost any HTML element, you can add attributes like width or height to inform the browser of how large or small you want your table cells to be.
- Tables should not be used for the entire layout of a website, but they can definitely be used for sections of data/information on a specific webpage.
- Lists can either be ordered (ol tag) or unordered (ul tag).
- When coding an ordered list, you can add the type attribute to change the way the numbers look, such as Roman Numerals, Arabic Numerals, etc.
- When coding an unordered list, you can add the type attribute to change the way the bullets look, such as circle, disc, and square.
PART 3: Assignments
Read More
Assignment #1 (1 Point): SoloLearn Lessons
Log into your SoloLearn account and find the course called HTML Fundamentals. Inside of this course, watch the following lessons (you may need your headphones), but when you finish, be sure to make note of how many SoloLearn points you have earned. Points are based on how many slides you complete and how many questions you answer correctly after each slide segment.
- Lists
- Blog Project: My Skills
- Tables
- Blog Project: My Schedule
- Inline and Block Level Elements

Assignment #2 (1 Point): Design Project
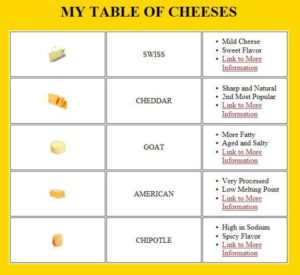
Open a new document with Notepad or Notepad++ and save it as “5-3_tableofcheese.html” in your WD2 Folder. Look up at least 5 different types of cheeses, learn a little bit about them, then design a simple web page with some kind of a table with information about those 5 cheese types. Your webpage must include: (1) A table with at least 5 rows and 3 columns, (2) At least 3 images, (3) At least 2 links, and (4) one part of your table must include either an ordered list (ol) or an unordered list (ul). You can be creative about how you include all these things.
Below are some resources that can help to get you started, but don’t forget about all the elements and attributes you learned how to use in Lessons 5.1 and 5.2:
Here is an example of what your page could look like.

Assignment #3 (1 Point): Discussion Topic
Sometimes this class can get pretty loud. And it can be difficult, especially for students in Web Design II, to avoid distractions. And even though there is no way to avoid the fact that we share rooms, what are some ways that your class could be better or more improved? If you run out of ideas, consider the things that you’ve enjoyed so far in this class. Go to the eCampus Discussion Board, find the appropriate Discussion Topic for the lesson, and write a short, 100 word post sharing your ideas about what could make the class better or what about the class has been really good.
One of the ways you can earn the point for this assignment is to respond to someone else’s post. But you still have to write 100 total words. That means, for example, that you could respond to two different people with 50 words each. More is always better, but you can simply write your own post if you find that easier.
Assignment #4 (1 Point): Review and Quiz
Look over the 5.3 Review Sheet. Read over the vocabulary terms. Look over the questions. Make sure you know how to answer each question. Then go to eCampus, find the quiz for Lesson 5.3, and take it. This is a way for you to show the teacher that you have finished this lesson.
If you have finished the assignments in this lesson, you will need a new password so that you can enter Lesson 5.4. Feel free to ask the teacher and don’t be afraid to raise your hand or go up to ask. If you are actually finished with a lesson, you will get an answer.