 Learning Goal #8
3JS Interactive Environments
Students will be able to design an interactive game environment with controllable avatars and unique objects.
GETTING STARTED
Read More The purpose of this lesson is to get everyone comfortable with setting up a game environment, working with colors and backgrounds, and building multiple three-dimensional objects. During the next several days, you and your team will be building a creative game environment, so it is in ALL of your interest to pay attention and listen for new tips that you might have missed throughout the semester. Even if you think you’re an expert at all the codes from class (chances are, no one does), there are a few new tips in this lesson that everyone will be hearing for the first time.
This lesson is broken into three parts with 4-6 “How Do I” tips inside of each part along with a challenge at the end. As a class, we will discuss each part and each of the “How Do I” tips, but you will be responsible for solving each challenge. If you complete a challenge, do not go onto the next part. Instead, spend some time with your team making sure that ALL OF YOU are comfortable with all the “How Do I” tips. Chances are, your team will benefit from your support. If you and your team are comfortable with all the “How Do I” tips, then it’s time for all of you to get up and assist another team until almost everyone feels comfortable. Remember, this is about everyone getting comfortable and it’s not just about you. It’s about you, your team, and anyone else who needs your support.
- Step 1: File Setup
Create a new document with Notepad++ called “shipsatsea.html” and save it to your LG8_gamejs subfolder. - Step 2: Code Setup
Copy this source code into your Notepad++ program and then set up your split screen.
Part 1: Organizing the Layout
Read More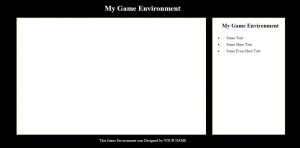 Tip 1: How Do I… Set Up the Title?
The TITLE element on Line 4 allows you to input whatever name you want to show up in the Tab at the top of your browser. Anything you type into this element will not show up on the page.
Tip 2: How Do I… Style the Layout?
Each of the items you choose to style must connect to an element that exists somewhere below in the body. For example, there is an H1 element on Line 15 and the color of that element connects with the color found in the style on Line 7. In the same way, the UL element (which stands for unordered list) from Line 31-36 is assigned to have a background color, a margin, a border, and even a height from Line 9. Notice that every time you declare something new you want in the style, you must use colons and semicolons in the appropriate pattern.
Tip 3: How Do I… Manipulate the Camera?
Line 22 sets the perspective of the camera, but at this early stage, it’s difficult to see any change in the camera because there isn’t anything on the X, Y, or Z axis lines. However, this is exactly where you can make your game environment completely unique. You can even pull out the aspect_ratio variable and input a number or use negatives to watch a twisted view of the camera.
Tip 4: How Do I… Style the Environment?
Notice Line 26 where it says .setAttribute. Inside the parenthesis are a bunch of other styles. That’s the way you would style the environment of the game. You’re basically setting up another canvas as you can see on Line 24. You could decide that the height of your environment needs to be taller (height:500px;) or that the environment should be on right instead of the left (float:left;).
Tip 5: How Do I… Include or Change Text/Content?
Normally, a box with text in it (especially one that sits next to a game) would be used for writing rules or tips. The H1 and H2 elements are just different sized headings. The UL element is just an unordered list (if you change it to OL in the style and the body, you’ll get an ORDERED list). And the LI elements are the actual bullet points inside of the lists. That FOOTER element is nothing special. It’s just a place where you can write your own little copyright of some kind.
Practice Challenges
 Challenge 1
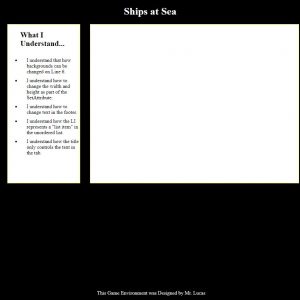
Go into the TITLE element and write the title “Ships at Sea”.
Challenge 2
Go to the .setAttribute section in your code and switch FLOAT:LEFT to FLOAT:RIGHT. You’ll notice that the text box now goes to the left and the empty game environment box goes to the right, but it’s unbalanced now. Fix it so that the right box isn’t so far away from the left box.
Challenge 3
Go into the LI elements and explain five different sections of the code that you understand so far.
Challenge 4
Put your name into the Footer so that it says this is your design.
When you are finished, check with your partner and help them finish as well. When you are BOTH finished, raise BOTH of your hands to show BOTH screens. Do NOT go on to Tip #2. Instead, go with your partner and look for someone who could use a little extra help.
Part 2: Working with Backgrounds
Read More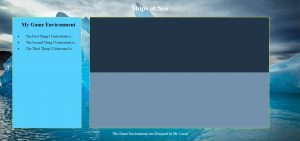 Tip 1: How Do I… Make a Single Color Background?
Right now, the background is a simple black and white, while the border is a simple shade of yellow. Using a simple program like HailPixel or just a six-digit combination of 0-9 and A-F, you can change the colors around to match whatever type of environment you are trying to design. Remember that the first two digits represent RED, the second two digits represent GREEN, and the last two digits represent BLUE.
Tip 2: How Do I… Make a Gradient Background?
In HTML, the difference between a single color and a gradient is pretty simple. Gradients come in linear and radial forms. With a single color, your code might look like background:#ff00ff;, but with a gradient, your code might look like background:linear-gradient(#ff00ff,#aa00cc);. To read more about working with gradients, check out linear gradients, diagonal gradients, angled gradients, multi-colored stops, and radial gradients.
Tip 3: How Do I… Make an Image into a Background?
To change a background from a color or a gradient to an image, the MOST important thing you need is the proper location of an image. The SECOND MOST important thing you need is the proper syntax in your code. When changing from a gradient to an image, for example, you would change background:linear-gradient(red, blue); to background:url(FILEPATH or URL);. The FILEPATH is how it will get to an image file in one of your folders, but the URL is how it will get to an image file online. You might notice from time to time that your image is too large or too small for the space. So to make it fit the space, you can write things like background:url(URL) center fixed no-repeat; or even add another line that says background-size:cover; or background-size:contain; depending on what you want or need for your environment. Make sure that you put all of your images in the same LG8_gamejs folder that you’re putting everything else. Otherwise, you’ll need to write a longer FILEPATH in order for your document to find the image (like ../images/abstract/ab1.jpg).
Tip 4: How Do I… Know the Difference Between Multiple Backgrounds?
If you’ve already been messing around, then you’ve probably realized that there are three different backgrounds in your Ships At Sea demo. There is the BODY background (for the whole page). There is the UL background (where your bullet points are located). And there is the SCRIPT/CANVAS background (where your game background will be designed). When designing a game that exists on a full page, you probably want to make sure that all the backgrounds match in some way.
Tip 5: How Do I… Pull Color from an Image Background?
Let’s imagine that you wanted to use a background image in your body, but you did’t want to use a background image in your game environment script. At the same time, you wanted to use a background color or a background gradient that blends well with the background image you’ve chosen to use. The problem is that you don’t know EXACTLY what colors are in the image. If you want to find the colors from an image in your images folder, try using the HTML Color Codes Tool. If that site isn’t working, just Google “Color from an Image” and you’ll find TONS of online resources for pulling color from one of your pictures.
Practice Challenges
 Challenge 1
Find a LARGE image of ice to put into the background of the BODY.
Challenge 2
Get the colors from the image you used and create some kind of two-color-gradient-stop in the script style (the empty environment).
Challenge 3
Using another color from the image you found, put a single color in the background of the UL text box.
Challenge 4
Change the H1 element so that it says “Ships at Sea” and find a color for the text that blends well with the background.
When you are finished, it should look something like this. Check with your team and help them finish as well. When you are ALL finished, raise ALL of your hands to show BOTH screens. Do NOT go on to Part #3. Instead, go with your team to find others around the room who might need support.
Part 3: Working with Shapes
Read More Copy/paste this Object Code Snippet near the bottom of your code above the line that says “renderer.render(scene, camera)” (probably around Line 29).
Tip 1: How Do I… Know What Shapes I Can Create?
By now, you’ve gotten pretty comfortable with changing shapes, but it’s easy to forget which ones are available. As you can tell from the demo shape, simply by taking SphereGeometry and changing the dimensions, the positions, and the rotations, you can get a pretty odd looking shape. The other shapes you can build from are (1) CubeGeometry, (2) CylinderGeometry, (3) PlaneGeometry, (4) TorusGeometry, and (5) TorusKnotGeometry. From time to time, you can also use CircleGeometry, BoxGeometry, TubeGeometry, or even RingGeometry, but your dimensions have to be VERY specific to make them work. You can make all four of those last shapes by building from the other six.
Tip 2: How Do I… Remove the Multi-Color Mesh?
When you see MeshNormalMaterial, there’s usually just a couple of empty parenthesis. Mesh is another way of describing a “net” that goes over something. In this case, it’s a simple 3D Shape. If we leave it as MeshNormalMaterial, then the code will automatically use a multi-colored mesh. But if we change it to MeshBasicMaterial, the type of mesh will also change.
Tip 3: How Do I… Create My Own Mesh Color?
To change the color of your mesh, make sure that it’s set to MeshBasicMaterial, then go into the parenthesis and add the curly mustache brackets (like this ({ }) ). Then inside the mustache brackets, write color:0xFF00FF or whatever the color value is that you want to use (like this ({ color:0xff00ff }) ). Notice that when you put color into a mesh, you can’t use the hashtag. Instead, the 0x replaces #.
Tip 4: How Do I… Turn My Shape Into a Wireframe?
Sometimes it’s cool to see the inside of a 3D shape, so instead of showing the whole shape, you just add a wireframe. To do this, go to the end of the color you added and add a comma, then write wireframe:true (like this ({ color:0xff00ff, wireframe:true }) ). By default, the wireframe will be just 1px thick. To make it thicker, add another comma followed by wireframeLinewidth:3 (or whatever pixel thickness you want). Be careful to remember that each command is separated by a comma, but you can’t put a comma at the end or the browser will think you have something else to add and everything will disappear.
Tip 5: How Do I… Make My Objects More Transparent?
Sometimes it’s also cool to make things go a little bit invisible or make them slightly transparent. The word for this in most programming languages is opacity and only uses numbers that are less than 1 (for example, 0.5, 0.3, 0.7). The reason the numbers are less than 1 is because 1 represents a whole object and anything less than 1 is less than all of the object. To make your shape transparent, you can add another command after the wireframeLinewidth that says opacity:0.5 to get half transparency.
Tip 6: How Do I… Make Multiple Objects with the Same Code Snippet?
Technically, everything that begins with var is a variable. But if you look more closely at the example, the SAILBOAT variable is built on two other variables: SHAPE, which controls the shape, and COVER, which controls the way that shape looks. If you want more than one object in your environment and you want the second or third object to look different from the first, you have to create new subvariables on the other objects (for example, like SHAPE1 or COVER2). Of course, if you want the second and third objects to look just like the first, then you don’t even need to recopy the SHAPE and COVER lines because they’re already there in the code.
Practice Challenges
 Challenge 1
Add at least two more sailboats (Tip: Copy/paste the object code, but change the variables).
Challenge 2
Add at least four small stars in the background (Tip: Copy/paste the object code, but change the variables and the shapes).
Challenge 3
Make each of the sailboats a different color wireframe.
When you are finished, it should look something like this. Check with your partner and help them finish as well. When you are BOTH finished, raise BOTH of your hands to show BOTH screens. Do NOT go on to Tip #4. Instead, go with your partner to find others around the room who might need support.