 Learning Goal #7
3JS Variable Manipulation
Students will be able to apply their basic knowledge of JavaScript to manipulate three-dimensional objects.
VARIABLE MANIPULATION RULES
Read More As you learned in Lesson 7.3, you’ll be getting two or three zip folders per level over the next few days. Your job is to dig into the correct files and manipulate some of the variables to make your designs unique. But you’ll also need to consider the following rules.
RULE 1: TEAMS ONLY
Every time you change a variable and see something really cool, you’ll be tempted to twist your screen and show someone else in the room. Don’t. Save your work for the tour at the end of each Variable Manipulation. You may share what you’ve done with your shoulder partner or even help them to have a little success, but do not get up from your seat or roll around to another area. The farthest you can go to show someone is your own team.
RULE 2: JS NOTES
You are not allowed to just change variables inside of these codes without leaving notes about what you changed. Take time to insert those // slashes on the lines above your changes and explain, as best as you can, what that variable manipulation actually did.
RULE 3: VOLUME RESPECT
Since this is just about you and your partner, please avoid loud gasps or shouts when you see something cool on the screen. It distracts other teams and makes it hard for everyone in the room to focus.
Variable Manipulation #4 (Warm Up)
Read More STEP 1: DOWNLOAD THE ZIP – Click here to download the Zip File for Variable Manipulation #4
STEP 2: FIND THE DOWNLOAD – If you clicked on the download above and it automatically downloaded, that means your Zip folder is sitting in your Downloads folder. Simply go get it and move it to your LG7_threejs folder. But if you clicked on the download above and it asked you where to save the file, please make sure you put it in your LG7_threejs folder.
STEP 3: EXTRACT ALL – You cannot work with, change, or even open files very well if you’re looking inside the zipped version. To get the regular folder opened, you need to RIGHT-CLICK on the zip file and choose EXTRACT ALL. And that will be the folder you can go into and change things.
STEP 4: OPEN HTML – Your zip folder has many files, but the only one you can open with a browser is the HTML file. So go ahead and open splines.html with Chrome or Firefox to see what it looks like.
STEP 5: MANIPULATION – You should see 6 JS files and 1 HTML file, but only two of those files are worth manipulating. In the HTML file, you can change any of the SCRIPT variables. But the other one you can work with is hilbert3D.js. All of the others are part of the 3JS library you learned about in Level 3.1. They are considered DEPENDENT VARIABLES. Remember that variable manipulation can be more than just numbers. Variables can also be positive/negative, true/false, multiply/divide, add/subtract, etc.
STEP 6: WRITING COMMENTS – Be careful not to change a bunch of things at once or you’ll never know what happened. Try changing one thing at a time, refreshing your browser to see if anything changed, then writing a note about it in the SCRIPT with the // slashes. You’ll need to get in this habit because your learning goal project will require it.
STEP 7: ONLINE TIMER – At this point, your teacher will have already started the 15 minute clock. Be sure to use your time wisely and manipulate as many variables as you can in the time you have.
STEP 8: MANIPULATION TOUR – When the timer goes off at 15 minutes, you will be given 2 minutes to tour the classroom and see what others did with their codes.
The Steps of a Varman Exposition
Read More In elementary school, you learned about expository and narrative writing. For a narrative, you had the freedom to tell a story with your writing. For an expository paper, you had to explain something. This assignment is all about writing an expository paper that “explains” your process of changing variables in a code. And in order for an expository paper to be good, it has to be clearly written. Below are the most important things you need for today’s Variable Manipulation Exposition.
STEP 1: DON’T FORGET NOTES – Before you can write an expository paper, you still have to go through all the same basics that you’re already familiar. That means downloading the code, looking for variables, and as always, writing notes. The more notes you have, the easier it will be to work with your team on Step 2.
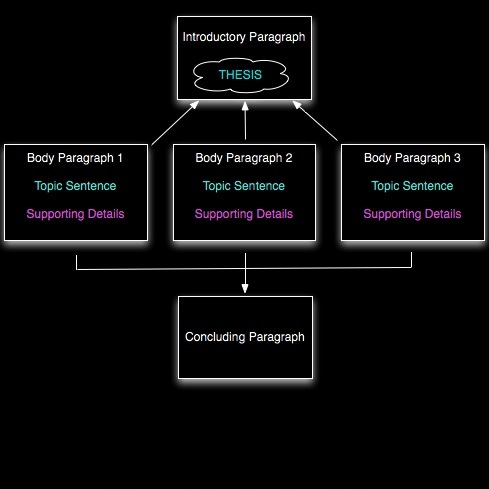
STEP 2: THREE PARAGRAPHS – For this activity, your expository paper must have exactly three paragraphs. No more. No less. That means you need to discuss, with your team, what you’ll want each paragraph to be about before you start writing them. Don’t try to wing it without at least a little planning.
STEP 3: INTRODUCTION & CONCLUSION – The first and last paragraph should always be an introduction to the overall purpose of the paper and a conclusion about what was accomplished. What does this code look like when you open it in a browser? How many variables did you change to make it look more interesting? What did it look like when you were finished? Is it an easy code to work with or a really challenging code? These are just a few ideas to help you think about how to start and how to finish.
STEP 4: THE MIDDLE PARAGRAPH – Your middle paragraph should have a lot of detail about what lines of code you changed, what the original values were, what the new values are, what happened when you changed specific variables, and why you think certain lines of code did what they did. These are just a few ideas to help you become more specific in your writing.
STEP 5: CLEAR AND EFFECTIVE – When you write out your introduction, your conclusion, or your middle paragraph, it’s extremely important that you proofread. A poorly written paper might make the purpose and the explanation harder to understand.
Variable Manipulation #5 (w/ Paper)
Read MoreThis is a Graded Variable Manipulation
A = 12+ Clearly Written Comments (per team) + 3 Paragraph Exposition
B = 10-11 Clearly Written Comments (per team) + 3 Paragraph Exposition
C = 10+ Clearly Written Comments (per team) + 1-2 Paragraph Exposition
D = 5-9 Clearly Written Comments (per team) + 1-2 Paragraph Exposition
F = 0-4 Clearly Written Comments (per team) + NO Paragraph Exposition
 STEP 1: DOWNLOAD THE ZIP – Click here to download the Zip File for Variable Manipulation #5
STEP 2: FIND THE DOWNLOAD – If you clicked on the download above and it automatically downloaded, that means your Zip folder is sitting in your Downloads folder. Simply go get it and move it to your LG7_threejs folder. But if you clicked on the download above and it asked you where to save the file, please make sure you put it in your LG7_threejs folder.
STEP 3: EXTRACT ALL – You cannot work with, change, or even open files very well if you’re looking inside the zipped version. To get the regular folder opened, you need to RIGHT-CLICK on the zip file and choose EXTRACT ALL. And that will be the folder you can go into and change things.
STEP 4: OPEN HTML – Your zip folder has many files, but the only one you can open with a browser is the HTML file. So go ahead and open triangles.html with Chrome or Firefox to see what it looks like.
STEP 5: MANIPULATION – You should see 4 JS files and 1 HTML file, but only one of those files are worth manipulating. In the HTML file, you can change any of the SCRIPT variables. All of the others are part of the 3JS library you learned about in Level 3.1. They are considered DEPENDENT VARIABLES. Remember that variable manipulation can be more than just numbers. Variables can also be positive/negative, true/false, multiply/divide, add/subtract, etc.
STEP 6: WRITING COMMENTS – Be careful not to change a bunch of things at once or you’ll never know what happened. Try changing one thing at a time, refreshing your browser to see if anything changed, then writing a note about it in the SCRIPT with the // slashes. You’ll need to get in this habit because your learning goal project will require it.
STEP 7: WRITING EXPOSITION – Choose a person in your group to open up a Microsoft Word Document and write a three-paragraph expository paper. The paper must have an introductory paragraph, a middle paragraph for explaining some of the changes you made (and what they did), and a conclusion paragraph. Whoever is not writing the paper should be involved in writing/organizing the notes and making sure the expository writer is being clear. This is a team based grade, so you must work together.
STEP 8: ONLINE TIMER – At this point, your teacher will have already started the 30 minute clock. Be sure to use your time wisely, manipulate a reasonable number of variables, and give yourselves plenty of time to write out a good expository paper.
Variable Manipulation #6 (Extra Time)
Read More STEP 1: DOWNLOAD THE ZIP – Click here to download the Zip File for Variable Manipulation #6
STEP 2: FIND THE DOWNLOAD – If you clicked on the download above and it automatically downloaded, that means your Zip folder is sitting in your Downloads folder. Simply go get it and move it to your 3JS folder. But if you clicked on the download above and it asked you where to save the file, please make sure you put it in your 3JS folder.
STEP 3: EXTRACT ALL – You cannot work with, change, or even open files very well if you’re looking inside the zipped version. To get the regular folder opened, you need to RIGHT-CLICK on the zip file and choose EXTRACT ALL. And that will be the folder you can go into and change things.
STEP 4: OPEN HTML – Your zip folder has many files, but the only one you can open with a browser is the HTML file. So go ahead and open fuzzyglobe.html with Chrome or Firefox to see what it looks like.
STEP 5: MANIPULATION – You should see 3 JS files and 1 HTML file, but only one of those files are worth manipulating. In the HTML file, you can change any of the SCRIPT variables. But all of the others are part of the 3JS library you learned about in Level 3.1. They are considered DEPENDENT VARIABLES. Remember that variable manipulation can be more than just numbers. Variables can also be positive/negative, true/false, multiply/divide, add/subtract, etc.
STEP 6: WRITING COMMENTS – Be careful not to change a bunch of things at once or you’ll never know what happened. Try changing one thing at a time, refreshing your browser to see if anything changed, then writing a note about it in the SCRIPT with the // slashes. You’ll need to get in this habit because your learning goal project will require it.
STEP 7: ONLINE TIMER – At this point, your teacher will have already started the 20-25 minute clock. Be sure to use your time wisely and manipulate as many variables as you can in the time you have.
STEP 8: MANIPULATION TOUR – When the timer goes off at 20-25 minutes, you will be given 2 minutes to tour the classroom and see what others did with their codes.